Показаны сообщения с ярлыком switch. Показать все сообщения

вторник, 10 июня 2014 г.

Семейство HP Baseline Switch - Как восстановить забытый пароль

Статья скопирована с оф сайта hp ссылка
Product:
3CBLSG16 - 3Com Baseline Switch 2916-SFP Plus
3CBLSG24 - 3Com Baseline Switch 2924-SFP Plus
3CBLSG24PWR - 3Com Baseline Switch 2924-PWR Plus
3CBLSG48 - 3Com Baseline Switch 2948-SFP Plus
Fix:
From a console connection:
Enter the following key sequence (CTRL/SHIFT - (minus)) ONCE at the appropriate time
Baseline 2924
Power cycle the switch:
When "Testing the System SDRAM........PASS" is seen
CTRL/Shift - (minus)
When "Autoboot in 2 seconds- press Return or Esc" is seen
Press Enter Immediately
At The Startup Menu
Select [3] Password Recovery
Select [5] Back
If "Autboot" does not appear, you have missed the opportunity to break-in.
Baseline 2916
Power cycle the switch:
Testing the System SDRAM........PASS
Boot1 Checksum Test
CTRL / Shift - (minus)
When "Autoboot in 2 seconds- press Return or Esc" is seen
Press Enter Immediately
At The Startup Menu
Select [3] Password Recovery
Select [5] Back
Baseline 2948
With a console connected reboot the device
Ctrl/C to enter Failsafe Mode
CFE>passwd
CFE>reset -sysreset
Symptom:
Baseline Switch Family - How to recover a forgotten password
Fact:
Lost or forgotten password

вторник, 11 февраля 2014 г.

3com --> HP

В работе используется два вида коммутаторов 3com которые в последствии стали HP.
ниже модели и ссылки на прошивки для удобства поиска.


3Com Baseline Switch 2916-SFP Plus и  3Com Baseline Switch 2924-SFP Plus теперь  
JE002A  HP Baseline Smart Gig SFP 24

ссылка на прошивки

3Com Baseline Switch 2920-SFP Plus теперь JE005A  HP 1910-16G Switch

 ссылка на прошивки

воскресенье, 18 августа 2013 г.

Начальная настройка коммутатора HP 1910 серии

HP logo По многочисленным просьбам напишу о том, как выполнить начальную настройку коммутаторов HP 1910 серии (JE005A, JE006A, JE007A, JE008A, JE009A, JG348A, JG349A, JG350A) и братьев-близнецов от 3Com – Baseline Switch 2952 и подобной серии. Вся настройка будет производиться через CLI (Command Line Interface), так как пользоваться web-интерфейсом подчас просто неудобно!
Как осуществить подключение к данному коммутатору, синтаксис команд для входа в режим конфигурирования, я написал в предыдущей статье.
Итак, подключаемся к устройству и входим в режим System View. Просмотрим, что уже сконфигурировано, задаем имя нашему коммутатору (Main-Switch), устанавливаем часовую зону (Москва), устанавливаем время и текущую дату, любуемся результатами:
Press ENTER to get started.
Login authentication
Username:admin
Password:

#Apr 26 12:00:32:638 2000 HP SHELL/4/LOGIN:
 Trap 1.3.6.1.4.1.25506.2.2.1.1.3.0.1:admin login from Console
%Apr 26 12:00:32:763 2000 HP SHELL/5/SHELL_LOGIN: admin logged in from aux0.
_cmdline-mode on
All commands can be displayed and executed. Continue? [Y/N]y
Please input password:******
Warning: Now you enter an all-command mode for developer's testing, some commands may affect operation
by wrong use, please carefully use it with our engineer's direction.
system-view
System View: return to User View with Ctrl+Z.
[HP]display current-configuration
[HP]sysname Main-Switch
[Main-Switch]clock timezone MSK4 add 04:00:00
[Main-Switch]quit
clock datetime 12:47:00 02/06/2013
system-view
System View: return to User View with Ctrl+Z.
[Main-Switch]display clock
12:47:10 MSK4 Wed 02/06/2013
Time Zone : MSK4 add 04:00:00
[Main-Switch]
Теперь активируем необходимые сервисы (Telnet и SSH), задаем супер-пароль и пароль локальному пользователю admin (пароли задавайте свои). По желанию, вы можете завести своего пользователя (не забудьте только дать ему разрешение на интересующие вас сервисы: ssh, telnet или terminal):
[Main-Switch]telnet server enable
% Start Telnet server
[Main-Switch]ssh server enable
Info: Enable SSH server.
[Main-Switch]super password level 3 simple PASS1
[Main-Switch]local-user admin
[Main-Switch-luser-admin]password simple PASS2
[Main-Switch-luser-admin]quit
[Main-Switch]
Настроим параметры интерфейса Vlan-interface1 (в который объединены по-умолчанию все сетевые интерфейсы коммутатора): его описание, ip-адрес, установим маршрут по-умолчанию (192.168.0.1 – маршрутизатор), настроим сервис сетевого времени ntp (на 192.168.0.1 работает ntpd сети):
[Main-Switch]interface Vlan-interface1
[Main-Switch-Vlan-interface1]description LOCALNET
[Main-Switch-Vlan-interface1]ip address 192.168.0.10 255.255.255.0
[Main-Switch-Vlan-interface1]quit
[Main-Switch]ip route-static 0.0.0.0 0.0.0.0 192.168.0.1
[Main-Switch]ntp-service source-interface Vlan-interface1
[Main-Switch]ntp-service unicast-server 192.168.0.1
Зададим настройки для DNS:
[Main-Switch]dns domain domain.ru
[Main-Switch]dns server 192.168.0.2
[Main-Switch]dns source-interface Vlan-interface1
Пусть, к примеру, с 1 по 6 интерфейс нашего коммутатора будут не использованными. Зададим каждому из них описание и “опустим” его:
[Main-Switch]interface GigabitEthernet 1/0/1
[Main-Switch-GigabitEthernet1/0/1]description NOT-USED
[Main-Switch-GigabitEthernet1/0/1]shutdown
[Main-Switch-GigabitEthernet1/0/1]quit
[Main-Switch]
Если вы желаете собирать статистику с помощью snmp, вам необходимо сделать следующие настройки:
[Main-Switch]snmp-agent
[Main-Switch]snmp-agent community read public
[Main-Switch]snmp-agent community write private
[Main-Switch]snmp-agent sys-info contact support@domain.ru
[Main-Switch]snmp-agent sys-info location SIT, Domian
[Main-Switch]snmp-agent sys-info version all
Про настройку vlan. Допустим в нашей сети существует vlan 100, предназначенный для гостей и сторонних пользователей. Разберем общий случай, когда наш настраиваемый сейчас коммутатор является “проходным”. Т.е. к нему непосредственно подключено два “гостя” из подсети, настроенной для vlan 100 (порты GigabitEthernet 1/0/20 и GigabitEthernet 1/0/21, в которых будет непосредственно тегированный трафик) и два порта являются транслирующими гибридными (GigabitEthernet 1/0/27 и GigabitEthernet 1/0/28, по которым идет и тегированный трафик, и нетегированный).
Обозначим наличие нашего vlan’а и сделаем описание для портов GigabitEthernet 1/0/20 и GigabitEthernet 1/0/21:
[Main-Switch]vlan 100
[Main-Switch-vlan100]description GUESTNET
[Main-Switch-vlan100]port GigabitEthernet 1/0/20
[Main-Switch-vlan100]port GigabitEthernet 1/0/21
[Main-Switch-vlan100]quit
[Main-Switch]interface GigabitEthernet 1/0/20
[Main-Switch-GigabitEthernet1/0/20]description GUEST1
[Main-Switch-GigabitEthernet1/0/20]quit
[Main-Switch]interface GigabitEthernet 1/0/21
[Main-Switch-GigabitEthernet1/0/21]description GUEST2
[Main-Switch-GigabitEthernet1/0/21]quit
[Main-Switch]
Настроим гибридные порты GigabitEthernet 1/0/27 и GigabitEthernet 1/0/28:
[Main-Switch]interface GigabitEthernet 1/0/27
[Main-Switch-GigabitEthernet1/0/27]description TO-SERVERN
[Main-Switch-GigabitEthernet1/0/27]port link-type hybrid
[Main-Switch-GigabitEthernet1/0/27]port hybrid vlan 100 tagged
 Please wait... Done.
[Main-Switch-GigabitEthernet1/0/27]port hybrid vlan 1 untagged
 Please wait... Done.
[Main-Switch-GigabitEthernet1/0/27]quit
[Main-Switch]interface GigabitEthernet 1/0/28
[Main-Switch-GigabitEthernet1/0/28]description TO-OTHERS
[Main-Switch-GigabitEthernet1/0/28]port link-type hybrid
[Main-Switch-GigabitEthernet1/0/28]port hybrid vlan 100 tagged
 Please wait... Done.
[Main-Switch-GigabitEthernet1/0/28]port hybrid vlan 1 untagged
 Please wait... Done.
[Main-Switch-GigabitEthernet1/0/28]quit
[Main-Switch]
Теперь можно просмотреть, что у нас получилось и сохраним сделанные изменения:
[Main-Switch]display current-configuration
#
 version 5.20, Release 1513P06
#
 sysname Main-Switch
#
 clock timezone MSK4 add 04:00:00
#
 super password level 3 cipher $c$3$b+gWAA1NfPIXi2Rnzk/ABXPTg6E+/38A2g==
#
 domain default enable system
#
 dns server 192.168.0.2
 dns domain domain.ru
 dns source-interface Vlan-interface1
#
 telnet server enable
#
 ip ttl-expires enable
#
vlan 1
#
vlan 100
 description GUESTNET
#
domain system
 access-limit disable
 state active
 idle-cut disable
 self-service-url disable
#
user-group system
#
local-user admin
 password cipher $c$3$ef/TRA/SrMaU2S9HxDEhhGMIUoivTrkdnA==
 authorization-attribute level 3
 service-type ssh telnet terminal
#
 stp mode rstp
 stp enable
#
interface NULL0
#
interface Vlan-interface1
 description LOCALNET
 ip address 192.168.0.10 255.255.255.0
#
interface GigabitEthernet1/0/1
 description NOT-USED
 shutdown
 stp edged-port enable
...
#
interface GigabitEthernet1/0/7
 stp edged-port enable
...
#
interface GigabitEthernet1/0/20
 description GUEST1
 port access vlan 100
 stp edged-port enable
#
interface GigabitEthernet1/0/21
 description GUEST2
 port access vlan 100
 stp edged-port enable
#
interface GigabitEthernet1/0/22
 stp edged-port enable
...
#
interface GigabitEthernet1/0/26
 stp edged-port enable
#
interface GigabitEthernet1/0/27
 description TO-SERVERN
 port link-type hybrid
 port hybrid vlan 100 tagged
 port hybrid vlan 1 untagged
 stp edged-port enable
#
interface GigabitEthernet1/0/28
 description TO-OTHERS
 port link-type hybrid
 port hybrid vlan 100 tagged
 port hybrid vlan 1 untagged
 stp edged-port enable
#
 ip route-static 0.0.0.0 0.0.0.0 192.168.0.1
#
 snmp-agent
 snmp-agent local-engineid 800063A203D07E284B2068
 snmp-agent community read public
 snmp-agent community write private
 snmp-agent sys-info contact support@domain.ru
 snmp-agent sys-info location SIT, Domian
 snmp-agent sys-info version all
#
 ntp-service source-interface Vlan-interface1
 ntp-service unicast-server 192.168.0.1
#
 ssh server enable
#
user-interface aux 0
 authentication-mode scheme
user-interface vty 0 15
 authentication-mode scheme
#
return
[Main-Switch]save
The current configuration will be written to the device. Are you sure? [Y/N]:y
Please input the file name(*.cfg)[flash:/startup.cfg]
(To leave the existing filename unchanged, press the enter key):
 Validating file. Please wait....
 Saved the current configuration to mainboard device successfully.
 Configuration is saved to device successfully.
[Main-Switch]
Как настроен тот или иной элемент вашей конфигурации можно просмотреть с помощью команды display + …
[Main-Switch]display dns server
 Type:
  D:Dynamic    S:Static
DNS Server  Type  IP Address
    1       S     192.168.0.2
[Main-Switch]display ntp-service status
 Clock status: synchronized
 Clock stratum: 3
 Reference clock ID: 192.168.0.1
 Nominal frequency: 100.0000 Hz
 Actual frequency: 100.0000 Hz
 Clock precision: 2^17
 Clock offset: -0.0863 ms
 Root delay: 10.89 ms
 Root dispersion: 26.96 ms
 Peer dispersion: 16.68 ms
 Reference time: 10:34:41.318 UTC Feb 6 2013(D4BCB041.5177318F)
[Main-Switch]display vlan 100
 VLAN ID: 100
 VLAN Type: static
 Route Interface: not configured
 Description: GUESTNET
 Name: VLAN 0100
 Tagged   Ports:
    GigabitEthernet1/0/27    GigabitEthernet1/0/28
 Untagged Ports:
    GigabitEthernet1/0/20    GigabitEthernet1/0/21
[Main-Switch]]display ssh server status
 SSH server: Enable
 SSH version : 1.99
 SSH authentication-timeout : 60 second(s)
 SSH server key generating interval : 0 hour(s)
 SSH authentication retries : 3 time(s)
 SFTP server: Disable
 SFTP server Idle-Timeout: 10 minute(s)
[Main-Switch]display snmp-agent sys-info
   The contact person for this managed node:
           support@domain.ru
   The physical location of this node:
           SIT, Domian
   SNMP version running in the system:
           SNMPv1 SNMPv2c SNMPv3
Отменить какую-либо настройку можно с помощью команды undo.
Вот, в принципе, и все. Именно с такими настройками у меня работает несколько коммутаторов в сети с поддержкой нескольких vlan.
Оригинал http://www.maxblogs.ru/articles/nachalnaya-nastroika-kommutatora-hp-1910-serii

CLI в 3Com Baseline Switch 2952-SFP Plus

HP logo Возможности интерфейса командной строки (англ. Command line interface, CLI). Получить доступ к полному набору команд на данном свиче оказалось делом не тривиальным.
Почему-то производитель предлагает производить настройку этого оборудования исключительно через web-интерфейс. Это довольно не удобно. Поэтому добавив коммутатору необходимые сервисы (ssh или Telnet), сконфигурировав доступ пользователю к этим сервисам, войдем в наш свич, используя, к примеру, ssh:
 login as: admin
 admin@192.168.100.20’s password:

 ******************************************************************************
 * Copyright © 2004-2012 3Com Corp. and its licensors. All rights reserved.   *
 * This software is protected by copyright law and international treaties.    *
 * Without the prior written permission of 3Com Corporation and its licensors,*
 * any reproduction republication, redistribution, decompiling, reverse       *
 * engineering is strictly prohibited. Any unauthorized use of this software  *
 * or any portion of it may result in severe civil and criminal penalties, and*
 * will be prosecuted to the maximum extent possible under the applicable law.*
 ******************************************************************************
Но, как оказалось, список команд для администрирования очень невелик:
<3com baseline="" switch="">?
User view commands:
  initialize  Delete the startup configuration file and reboot system
  ipsetup     Specify the IP address of the VLAN interface 1
  password    Specify password of local user
  ping        Ping function
  quit        Exit from current command view
  reboot      Reboot system
  summary     Display summary information of the device.
  upgrade     Upgrade the system boot file or the Boot ROM program
Полезным из всего этого может оказаться только команда summary:
 <3com baseline="" switch="">sum
 Select menu option:             Summary
 IP Method:                      Manual
 IP address:                     192.168.100.20
 Subnet mask:                    255.255.255.0
 Default gateway:

 Current boot app is: flash:/V1910-CMW520-R1111.bin
 Next main boot app is: flash:/v1910-cmw520-r1111.bin
 Next backup boot app is: NULL

 3Com Corporation
 3Com Baseline Switch 2952-SFP Plus Software Version 5.20 Release 1111
 Copyright © 2004-2012 3Com Corp. and its licensors. All rights reserved.
 3Com Baseline Switch 2952-SFP Plus uptime is 0 week, 0 day, 0 hour, 6 minutes

 3Com Baseline Switch 2952-SFP Plus
 128M    bytes DRAM
 128M    bytes Nand Flash Memory
 Config Register points to Nand Flash

 Hardware Version is REV.B
 CPLD Version is 002
 Bootrom Version is 151
 [SubSlot 0] 48GE+4SFP Hardware Version is REV.B
Но все-таки существует возможность получения полного списка команд и настройки данного сетевого коммутатора через его командную строку. Для этого дадим “волшебную” команду _cmdline-mode on, подтвердим свое нетерпимое желание получить доступ к полному списку команд и введем заводской пароль 512900:
<3com baseline="" switch="">_cmdline-mode on
All commands can be displayed and executed. Continue? [Y/N]y
Please input password:******
Warning: Now you enter an all-command mode for developer's testing, some commands may affect
operation by wrong use, please carefully use it with our engineer's direction.
В этом режиме становятся доступными гораздо больше команд!
<3com baseline="" switch="">?
User view commands:
  archive        Specify archive settings
  backup         Backup next startup-configuration file to TFTP server
  boot-loader    Set boot loader
  bootrom        Update/read/backup/restore bootrom
  cd             Change current directory
  clock          Specify the system clock
  cluster        Run cluster command
  copy           Copy from one file to another
  debugging      Enable system debugging functions
  delete         Delete a file
  dir            List files on a file system
  display        Display current system information
  fixdisk        Recover lost chains in storage device
  format         Format the device
  free           Clear user terminal interface
  ftp            Open FTP connection
  initialize     Delete the startup configuration file and reboot system
  ipsetup        Specify the IP address of the VLAN interface 1
  lock           Lock current user terminal interface
  logfile        Specify log file configuration
  mkdir          Create a new directory
  more           Display the contents of a file
  move           Move the file
  ntdp           Run NTDP commands
  password       Specify password of local user
  ping           Ping function
  pwd            Display current working directory
  quit           Exit from current command view
  reboot         Reboot system
  rename         Rename a file or directory
  reset          Reset operation
  restore        Restore next startup-configuration file from TFTP server
  rmdir          Remove an existing directory
  save           Save current configuration
  schedule       Schedule system task
  screen-length  Specify the lines displayed on one screen
  send           Send information to other user terminal interface
  sftp           Establish one SFTP connection
  ssh2           Establish a secure shell client connection
  stack          Switch stack system
  startup        Specify system startup parameters
  summary        Display summary information of the device.
  super          Set the current user priority level
  system-view    Enter the System View
  telnet         Establish one TELNET connection
  terminal       Set the terminal line characteristics
  tftp           Open TFTP connection
  tracert        Trace route function
  undelete       Recover a deleted file
  undo           Cancel current setting
  upgrade        Upgrade the system boot file or the Boot ROM program
Но чтобы войти в режим конфигурирования, необходимо дать команду system-view, после чего мы получим полноценный доступ к управляющим командам:
<3com baseline="" switch="">sys
System View: return to User View with Ctrl+Z.
[3Com Baseline Switch]?
System view commands:
  aaa                      Specify AAA configuration
  acl                      Specify acl configuration information
  archive                  Specify archive settings
  arp                      Specify ARP configuration information
  bootrom-update           bootrom update
  clock                    Specify the system clock
  cluster                  Specify cluster configuration information
  command-privilege        Specify the command level
  configuration            Specify configuration settings
  copyright-info           Copyright information configuration
  cut                      Cut connection
  delete                   Delete function
  dhcp                     DHCP configuration subcommands
  dhcp-snooping            DHCP Snooping
  display                  Display current system information
  domain                   Add domain or modify domain attributes
  dot1x                    Specify 802.1X configuration information
  execute                  Batch Command
  file                     Specify file system configuration information
  ftp                      Specify FTP configuration information
  gratuitous-arp-learning  Gratuitous Arp learning function
  gratuitous-arp-sending   Sending gratuitous-arp packet when receiving
                           different sub-network arp packet function
  habp                     Specify HABP configuration information
  header                   Specify the login banner
  hotkey                   Specify hotkey configuration information
  igmp-snooping            IGMP snooping
  info-center              Specify information center configuration information
  interface                Specify the interface configuration view
  ip                       Specify IP configurations for the system
  job                      Schedule a system task
  jumboframe               Jumboframe command
  lacp                     Configure LACP Protocol
  lldp                     Link Layer Discovery Protocol(802.1ab)
  local-user               Specify local user configuration information
  logfile                  Specify log file configuration
  loopback-detection       Detect if loopback exists
  mac-address              Configure MAC address
  mib-style                MIB style
  mirroring-group          Specify mirroring-group
  multicast-vlan           Multicast VLAN
  ndp                      Neighbor discovery protocol
  ntdp                     Specify NTDP configuration information
  ntp-service              Specify NTP(Network Time Protocol) configuration
                           information
  ping                     Ping function
  pki                      Specify PKI module configuration information
  port-group               Port group
  public-key               Specify public-key module configuration information
  qos                      Command of QoS(Quality of Service)
  quit                     Exit from current command view
  radius                   Specify RADIUS configuration information
  return                   Exit to User View
  rmon                     Specify RMON
  save                     Save current configuration
  sftp                     Specify SFTP service attribute
  snmp-agent               Specify SNMP(Simple Network Management Protocol)
                           configuration information
  ssh                      Specify SSH (secure shell) configuration information
  ssl                      Specify SSL (Secure Socket Layer) configuration
                           information
  stack                    Switch stack system
  storm-constrain          Port storm-constrain
  stp                      Spanning tree protocol
  super                    Modify super password parameters
  sysname                  Specify the host name
  system-failure           System failure handling method
  system-guard             System guard function
  tcp                      Specify TCP(Transmission Control Protocol)
                           configuration information
  telnet                   Specify TELNET configuration information
  temperature-limit        Set temperature limit
  tftp                     Specify TFTP configuration information
  tftp-server              TFTP Server
  time-range               Specify time-range configuration information
  tracert                  Trace route function
  traffic                  Specify traffic configuration information
  undo                     Cancel current setting
  user-group               Specify user group configuration information
  user-interface           Configure the user terminal interface
  vlan                     Configure VLAN
  voice                    Specify voice VLAN
  web                      Web configuration
Описание каждой из этих команд можно получить таким же способом, как и при конфигурировании cisco. Пример – опции команды clock:
[3Com Baseline Switch]clock ?
  summer-time  Configure summer time
  timezone     Configure time zone
Быть может, приведенная здесь информация окажется кому-нибудь полезной.

Оригинал http://www.maxblogs.ru/articles/cli-v-3com-baseline-switch-2952-sfp-plus

четверг, 18 июля 2013 г.

Сброс пароля на коммутаторе HP 1910 серии

HP logo В данной заметке опишу способ сброса пароля на коммутаторе HP 1910 серии. Он подойдет ко многим его модификациям: JE005A, JE006A, JE007A, JE008A, JE009A, JG348A, JG349A, JG350A. А так как компания Hewlett-Packard поглотила в свое время 3Com и продолжила выпускать их продукцию уже под своим брендом, то написанное ниже будет справедливо также и для коммутаторов 3Com Baseline Switch 2952 и подобной серии.
Для выполнения процедуры сброса забытого или неизвестного пароля вам необходим физический доступ к устройству. Подключите коммутатор с помощью соединительного кабеля (идет в комплекте) из порта Console (38400.8.1.N) на самом свиче к com-порту компьютера. При этом мной используется программа PuTTY: A Free Telnet/SSH Client:
About PuTTY
Для установки соединения с помощью этой программы, в главном окне установите переключатель в Serial:
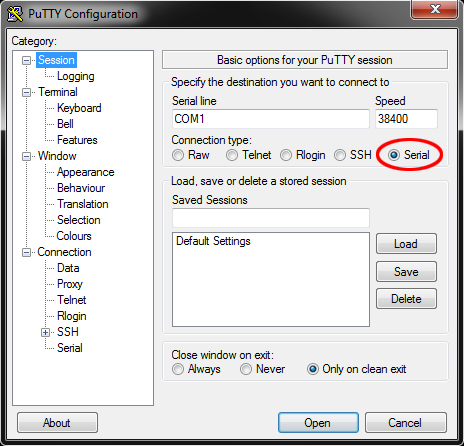
Подключение по COM порту
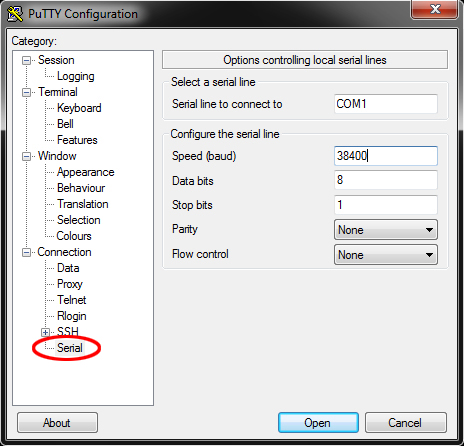
Затем измените настройки подключения в:
  • Speed (baud) – 38400;
  • Data bits – 8;
  • Stop bits – 1;
  • Flow control – None.
Настройки подключения по COM порту
Нажмите кнопку Open и только после этого подайте электропитание на коммутатор. Теперь в начальный момент загрузки, когда на экране вы увидите надпись Press Ctrl-B to enter Extended Boot menu, вы должны успеть нажать требуемую комбинацию (Ctrl-B) на клавиатуре для входа в расширенное меню загрузки. На вопрос Please input BootRom password, просто нажмите ввод. По-умолчанию данный пароль “пустой”:
 Starting……

 *************************************
 * HP V1910-24G Switch BOOTROM, Version 158 *
 *************************************
 Copyright © 2010-2012 Hewlett-Packard Development Company, L.P.

 Creation Date       : Jun 15 2012
 CPU L1 Cache        : 32KB
 CPU Clock Speed     : 333MHz
 Memory Size         : 128MB
 Flash Size          : 128MB
 CPLD Version        : 002
 PCB Version         : Ver.B
 Mac Address         : D07E284B2066

 Press Ctrl-B to enter Extended Boot menu…0
 Please input BootRom password:

    BOOT MENU

 1. Download application file to flash
 2. Select application file to boot
 3. Display all files in flash
 4. Delete file from flash
 5. Modify BootRom password
 6. Enter BootRom upgrade menu
 7. Skip current system configuration
 8. Set BootRom password recovery
 9. Set switch startup mode
 0. Reboot

 Enter your choice(0-9):
В данном меню выберите пункт 7 – “Пропустить существующую системную настройку”, подтвердите свое желание, ответив Y на соответствующий вопрос, и выполните перезагрузку коммутатора, выбрав пункт меню 0:
 Enter your choice(0-9): 7
 The current setting will run with current configuration file when reboot.
 Are you sure you want to skip current configuration file when reboot? Yes or No
 (Y/N):Y
 Setting…Done!

    BOOT MENU

 1. Download application file to flash
 2. Select application file to boot
 3. Display all files in flash
 4. Delete file from flash
 5. Modify BootRom password
 6. Enter BootRom upgrade menu
 7. Skip current system configuration
 8. Set BootRom password recovery
 9. Set switch startup mode
 0. Reboot

 Enter your choice(0-9): 0
 Starting……

 *************************************
 * HP V1910-24G Switch BOOTROM, Version 158 *
 *************************************
 Copyright © 2010-2012 Hewlett-Packard Development Company, L.P.

 Creation Date       : Jun 15 2012
 CPU L1 Cache        : 32KB
 CPU Clock Speed     : 333MHz
 Memory Size         : 128MB
 Flash Size          : 128MB
 CPLD Version        : 002
 PCB Version         : Ver.B
 Mac Address         : D07E284B2066

 Press Ctrl-B to enter Extended Boot menu…0
 Starting to get the main application file—flash:/V1910-CMW520-R1513P06.bin!…
 ……………………………………………………………………
 The main application file is self-decompressing……………………………
 ……………………………………………………………………
 ……Done!
 System is starting…
 Configuration file is skipped.
 User interface aux0 is available.

 Press ENTER to get started.
Нажав ENTER, вы попадете сразу в командную строку. Нам надо войти в режим конфигурирования с помощью команды _cmdline-mode on, введя заводской пароль 512900. После чего скопируем существующие настройки (если у вас есть такая необходимость) на встроенной флеш-карте в файл с другим названием:
_cmdline-mode on
All commands can be displayed and executed. Continue? [Y/N]y
Please input password:******
Warning: Now you enter an all-command mode for developer's testing, some commands may affect operation
by wrong use, please carefully use it with our engineer's direction.
copy flash:/startup.cfg flash:/startup.bak
Copy flash:/startup.cfg to flash:/startup.bak?[Y/N]:y
.
%Copy file flash:/startup.cfg to flash:/startup.bak...Done.
Теперь командой initialize произведем общий сброс устройства к заводским настройкам, после чего switch автоматически перезагрузится:
 initialize
  The startup configuration file will be deleted and the system will be rebooted. Continue? [Y/N]:y
  Please wait…
 #Apr 26 12:03:27:703 2000 HP DEVM/1/REBOOT:
  Reboot device by command.

 %Apr 26 12:03:27:793 2000 HP DEVM/5/SYSTEM_REBOOT: System is rebooting now.
При загрузке вы увидите информацию Startup configuration file does not exist. Все настройки были удалены. Логин и пароль по-умолчанию, используемые в коммутаторах данных серий:
  • логин – Admin;
  • пароль – пустой, его нет.
 Starting……

 *************************************
 * HP V1910-24G Switch BOOTROM, Version 158 *
 *************************************
 Copyright © 2010-2012 Hewlett-Packard Development Company, L.P.

 Creation Date       : Jun 15 2012
 CPU L1 Cache        : 32KB
 CPU Clock Speed     : 333MHz
 Memory Size         : 128MB
 Flash Size          : 128MB
 CPLD Version        : 002
 PCB Version         : Ver.B
 Mac Address         : D07E284B2066

 Press Ctrl-B to enter Extended Boot menu…0
 Starting to get the main application file—flash:/V1910-CMW520-R1513P06.bin!…
 ……………………………………………………………………
 The main application file is self-decompressing……………………………
 ……………………………………………………………………
 ……Done!
 System is starting…
 Startup configuration file does not exist.
 User interface aux0 is available.

 Press ENTER to get started.

 Login authentication

 Username:admin
 Password:
 
Войдем снова в режим конфигурирования, а затем в System View, где доступны все существующие команды CLI с помощью system-view и просмотрим существующую конфигурацию по-умолчанию с помощью display current-configuration:
 _cmdline-mode on
 All commands can be displayed and executed. Continue? [Y/N]y
 Please input password:******
 Warning: Now you enter an all-command mode for developer's testing, some commands may affect operation
 by wrong use, please carefully use it with our engineer's direction.
 system-view
 System View: return to User View with Ctrl+Z.
 [HP]display current-configuration
 #
  version 5.20, Release 1513P06
 #
  sysname HP
 #
  domain default enable system
 #
  ip ttl-expires enable
 #
 vlan 1
 #
 domain system
  access-limit disable
  state active
  idle-cut disable
  self-service-url disable
 #
 user-group system
 #
 local-user admin
  authorization-attribute level 3
  service-type ssh telnet terminal
 #
  stp mode rstp
  stp enable
 #
 interface NULL0
 #
 interface Vlan-interface1
  ip address dhcp-alloc
 #
 interface GigabitEthernet1/0/1
  stp edged-port enable
 #
 ...
 interface GigabitEthernet1/0/28
  stp edged-port enable
 #
 user-interface aux 0
  authentication-mode scheme
 user-interface vty 0 15
  authentication-mode scheme
 #
 return
 [HP]
Выйти из этого режима можно с помощью Ctrl+Z или команды quit.
Во всех режимах, кроме System View, вам доступна команда ipsetup, с помощью которой вы можете быстро настроить сеть на данном коммутаторе, после чего мы можем изъять файл со старыми настройками, положив его на tftp сервер в вашей сети (или же скачать его через web-интерфейс управления свича на настроенном вами ip):
[HP]quit
tftp 192.168.100.70 put flash:/startup.bak
  File will be transferred in binary mode
  Sending file to remote TFTP server. Please wait... \
  TFTP:     2839 bytes sent in 0 second(s).
  File uploaded successfully.

оригинал http://www.maxblogs.ru/articles/sbros-parolya-na-kommutatore-hp-1910-serii